As I mentioned in my Shirt Issue, I have several cheap and ill fitting shirts laying around in my closet. I decided it was time for my 'U.S. Polo Assn' shirt to find a new purpose in life, as a pattern base. The plan was to tailor the shirt until it fits great, then cut it apart and make a paper pattern from the pieces.
At this point, I think it's important to mention that I'm very much aware that I could just buy a shirt pattern, or even borrow one from Crissy (I'm sure she has at least 12). But that's not the way we do things around here. It's got to be the most difficult, drawn out, learning intensive route every time.
This is what I started with:
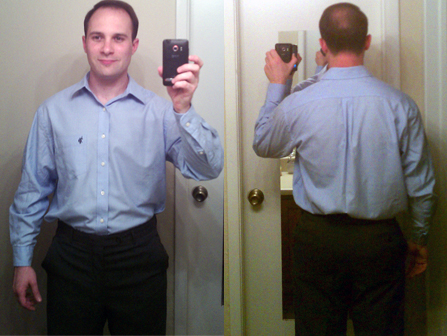
There is enough room in there for two of me. The last time I addressed this problem I used a modified 'pinch-and-pin' method to remove almost 8" of material from the body circumference. However, that shirt had no pleats, and this one has a sizable box pleat to contend with. While I think it looks stupid, I decided to just sew the pleat shut along the full length of the shirt.

Keeping things even was pretty simple since this shirt is a herringbone weave, so I had convenient guide-lines to follow. I went ahead and gave it a quick press to set the pleat. Once one side was pinned shut, I measured the width of the box pleat (1 1/2")

and then marked the width down the full length of the shirt. Again I used the shirt grain as a guide to make sure everything was even. I doubt it would have mattered if I was off a little here or there, so don't stress out if you're doing this on broadcloth.

And then carefully fold the shirt in half so that the two pleat edges are even. Leave the first side pinned shut during this. The goal is to have the outer pleat edges (the edges that face the side seams) touching.

As you can see here, after a good press, the pleat is folded over on itself. If we sew along the bottom edge of the pleat/fold the resulting stitch line will hold the pleat shut (making it into a functionless style piece). It will also be totally invisible since the pleat itself will cover it.

My stitch line. The pins here are just holding the fold shut while I sew. Remove them and press the pleat open. At this point we've removed 3" of material from the circumference of the body, let's check the fit.

You can see how much of a difference a little volume reduction can make, but it's still is too blousey for my tastes. Since the back is now stable, I feel safe taking some more material out from the side seams. For this I decided to remove 1" from each side at my waist, tapering to a 1/2" reduction at the armpit and shirt bottom. Here was the result:

Looking good! I'd wear this to work now. Except that I can now clearly see creasing by my arms. Creasing that tells me the shirt is too large across the shoulders. It's like this project is never ending.
(Author's note. This project is kind of long. Longer than I expected. I'm making an executive decision and splitting it into 2 parts for ease of browsing. Kyle Ruins a Shirt Part II)
No comments:
Post a Comment